Secure Channels: SSH and TLS
A secure channel is a means of data transmission between two channels, and it provides the following all of the following three: confidentiality, authenticity and integrity. Secure channels are implemented from the transport layer and above; and the two protocols we will be looking at are SSH and TLS.
Attacker Model
Before we start delving into the functioning of the SSH and TLS protocols, it is important to define what is the attacker capable of. We consider a secure channel safe against the following attacker model:
- Attacker has full control over the network (i.e., an attacker can sniff and examine all of the packets in the communication)
- Attacker can intercept, modify and send any message
- However, an attacker cannot decipher any of the encrypted content (as he doesn't possess the keys that encrypt the content)
This is called the Dolev-Yao model (default attacker model in distributed systems).
SSH
SSH stands for Secure SHell, and it is a protocol designed to create a secure channel between two hosts, and allows the client host to login to the SSH server, and perform actions in that machine (e.g.: file transfer, shell usage, and more).
SSH was introduced to replace protocols like Telnet, that allowed you to create login to another machine and control it remotely, but had a major problem: they lacked security mechanisms. SSH ensures confidentiality and integrity in the communication, and allows both parties in the communication to authenticate to each other.
How does SSH work?
The establishment of a SSH connection can be divided in three steps:
- Verification of server's identity by the client
- Negotiation of a secret key for encryption of all messages
- Authentication of the client
SSH is a protocol that will make use of both asymmetric cryptography (using public/private key pairs, for steps 1 and possibly 3) and symmetric cryptography (for step 2, and for all further communication).
We will now take a look at each step of the connection process.
1. Verification of Server Identity
The client starts by initiating a SSH connection request to the server. During this step, it is important that the client confirms the true identity of the server. Depending on whether it is the first time the client connects to this server, two things can happen:
- If the client has never connected to this server, it will verify the server's identity using the server's public key. Once that is done, the server is added to the
~/.ssh/known_hostsfile on the client machine for future logins. - If the client has connected to this server before, it will verify the server's identity with the information in the
known_hostsfile.
Once this step is concluded, we can move to the next step.
2. Negotiation of Secret Key
Client and server will now begin the negotiation of a secret key, to encrypt further messages. This is done using the Diffie-Hellman (or Elliptic-Curve DH) algorithm. After the secret key to use is agreed between the two parties, all further communication will be encrypted using that key.
3. Client Authentication
The last step in the connection process is the authentication of the client to the server. This can be done in two ways:
- Using password authentication (less secure)
- Using SSH Keys (more secure)
In password authentication, the client will simply send the password of the user that it is trying to login as in the server machine; if the password is correct. This is less secure, because password authentication is more vulnerable to attacks (brute force, phishing, etc.) than other alternatives like public-key authentication.
The other alternative is using SSH Keys. SSH keys are simply private/public key-pairs. To authenticate the client using SSH keys, a key-pair should be generated by the client, and the private key should be kept in the ~/.ssh/ folder in the client machine. On the other hand, the public key generated should be added to the ~/.ssh/authorized_keys file.
In the case that SSH keys are being used, the authentication process will look something like this:
- The client begins by sending a key ID, corresponding to the key ID of its public key
- The server will check its
authorized_keysfile, and search for the received key ID - If a match is found, then the server will generate a random number, and encrypt that random number with the client's public key. This encrypted message is then sent to the client
- After receiving this, the client will decrypt the generated random number with its private key. It will then compute the MD5 hash of this number plus the secret key agreed previously, and send it to the server
- The server will then receive this value, compute the MD5 hash of the original random number plus the agreed secret key, and check if these values match. If they do, then the client has proven it is the owner of the private key that is the pair to the public key with the ID sent in step 1.
SSH Tunneling
We can also leverage the SSH protocol for another purpose : tunneling. Tunneling is a technology that allows to transform the communication of one protocol into another protocol, while being transparent to the applications. For example, I may want to make a HTTP request to port 80 in a remote server using a ssh tunnel. This way, the request will be transmitted as a normal SSH message to port 22 in the server, and then when received by the sshd server can be forwarded to port 80.
For tunneling to work, there needs to be a mapping of local ports to remote ports. In the example below, we want to create an IMAP (mail protocol) connection using a SSH tunnel. Therefore, in the SSH tunnel configuration, we tell ssh client to listen to port 220 (port for this protocol) and to forward it to port 220 in the remote machine. This way, the outgoing IMAP traffic in the client will be captured by the SSH client, sent through a SSH connection, and the sshd server in the remote machine will decrypt it and forward it to its local port 220.
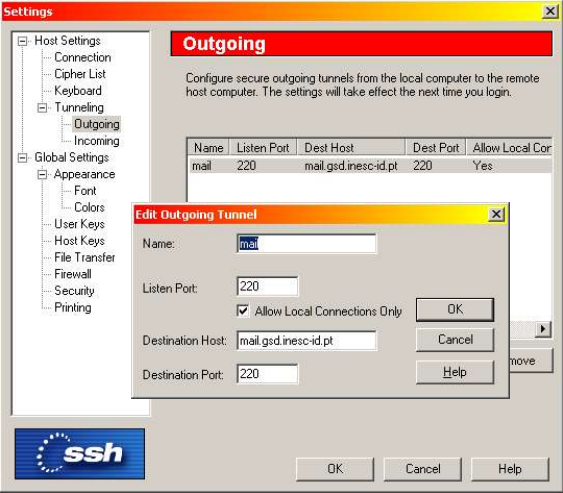
Fig.1: SSH tunnel configuration example
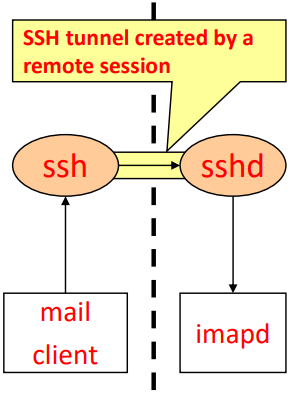
Fig.2: Diagram of the traffic flowing through a SSH tunnel
SSH Tunneling: Advantages and Disadvantages
Advantages of SSH tunneling:
- It's transparent to applications
- Allows to enforce confidentiality, integrity and authenticity to protocols that don't natively support these security features
Disadvantages:
- Makes it harder for admins to do port management
- Low flexibility for developers and users
TLS
TLS stands for Transport Layer Security; it is a protocol designed to create a secure channel for communication across the Internet, and it provides confidentiality, integrity, authenticity and key distribution. TLS "sits" between layers 4 and 5 of the OSI model, and it can be used by any TCP protocol to enforce security. This means that, unlike its predecessor SSL, that was aimed to only be used with HTTP communication, TLS is used by a variety of services and protocols running on the Internet (HTTP, SMTP, IMAP, POP3, etc.)
It is important to notice that TLS is just a protocol; not an API. In SSL, the reference API used was SSLref (used by Netscape Navigator, a web browser responsible for the early developments in SSL). For TLS, there are many APIs that applications can use, like:
- OpenSSL
- GnuTLS
- SSLeay
- Mbed TLS
- Java Secure Socket Extension (JSSE)
For HTTPS communication, the default port used is 443. It is also possible to upgrade any text-based connection to use TLS, with STARTTLS (used by many protocols, like SMTP, IMAP, POP, FTP, IRC, etc.)
TLS Operation Overview�
TLS, just like TCP, works under a client-server model. In the next chapter, we will dive into how does TLS actually work, but as a general overview, this how TLS handles the following topics:
-
Cryptographic Algorithms
- The client presents the cipher suites it supports
- The server picks one (usually, the more secure that it also supports)
-
Key management:
- Master key lifetime: the lifetime of the master key is the lifetime of the TLS session; however the recommended maximum master key lifetime is 24 hours
- Session key lifetime: usually, a session key lasts at most the lifetime of that TCP connection
TLS Protocol
The TLS protocol can be divided into the two parts:
- Record protocol
- Handshake protocol
We will take a deeper look into each part of the protocol.
Record Protocol
The record protocol is responsible to divide the data needed to be sent into blocks called records, and ensure the confidentiality and integrity of each sent record. A record is comprised of the following components:
- Record header: contains the length of the record, used TLS version and content type (message can be handshake, alert, data, etc.)
- Encrypted data fragment and MAC: The MAC of the data fragment to be sent will be generated and concatenated with the data fragment; then they will be encrypted with session key
The following image represents the content inside a record:
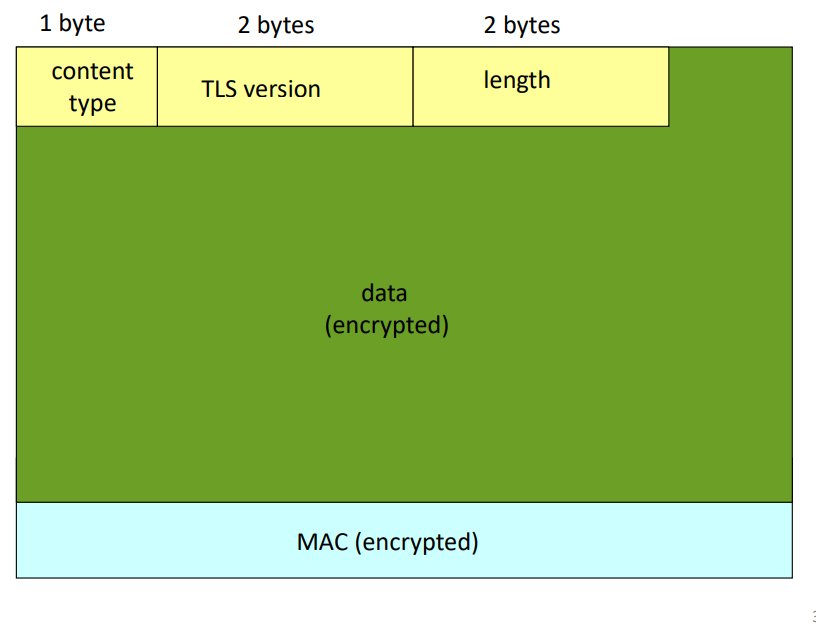
Fig.3: Content inside a record
Each data fragment can be up to bytes ( 16 KBytes)
Sequence Numbers
This doesn't prevent an attacker from replaying or reordering the messages. To combat this, a sequence number is introduced into the record. To prevent an attacker from replaying all the messages, a nonce is also used.
Therefore, the MAC is generated from: MAC( , seq | | data)
There is no sequence number field in a record; it is implicit to the message, and used in the MAC
Record Types
There is another possible attack that can be done: an attacker can forge a closure message, and one of the communication parties might think that all data has been sent, when in reality there was more.
The solution to this is including a record type in the record: 0 for data, 1 for closure. This record type is also included in the MAC to guarantee integrity.
This way, the MAC is generated from: MAC( , seq | | type | | data)
Handshake Protocol
The handshake protocol is the initial phase of the protocol, and it will serve as the base for the remainder of the communication. This phase has the following purposes:
- Server authentication
- Negotiate cryptographic algorithms
- Establishing keys
- Client authentication (optional)
Here is the handshake protocol phase step-by-step:
- Client sends list of supported crypto algorithms + nonce
- Server receives the list and picks one algorithm (usually, the more secure); it then sends the algorithm chosen + certificate (contains server's public key) + server nonce
- Client will then verify the received certificate, and extract the server's public key. Then, two things can happen:
- The client might compute the pre-master secret, encrypt it with server's public key, and send it to the server. If this happens, then the client and the server will generate the master key independently, from the pre-master secret and the two nonces exchanged
- Diffie-Hellman can be used to generate the pre-master secret, which combined with the nonces will be used to get the master key
- Client sends a MAC message of all of the previously sent messages and server verifies it
- Server sends a MAC message of all of the previously sent messages and client verifies it
The client, when it proposes the list of its supported algorithms to the server, presents for several different algorithms that are used during TLS; this is called the cipher suite. The agreed algorithms are:
- Public-Key algorithm (RSA, ECDSA, etc,)
- Symmetric key algorithm (AES_128, AES_256, etc.)
- MAC algorithm used (SHA2, SHA3, etc.)
Why are two nonces sent?
The reason two nonces are sent (steps 1 and 2) is the following:
Imagine Trudy is an attacker, and he is able to sniff all of the exchanged messages between Alice (client) and Bob (server). He then decides to repeat all of the messages sent by Alice to Bob. Because Bob will use a different nonce this time, the master secret will be different (master secret is derived from both nonces), and further communication will fail
Why send MAC of all the messages in the end of the handshake protocol?
The reason why we send the MAC of all the messages in the end of the handshake protocol, instead of sending a MAC for each message is because it is the handshake phase that setups the keys that are going to be used (these keys are needed to generate MAC)
The following image shows a typical handshake protocol message exchange:
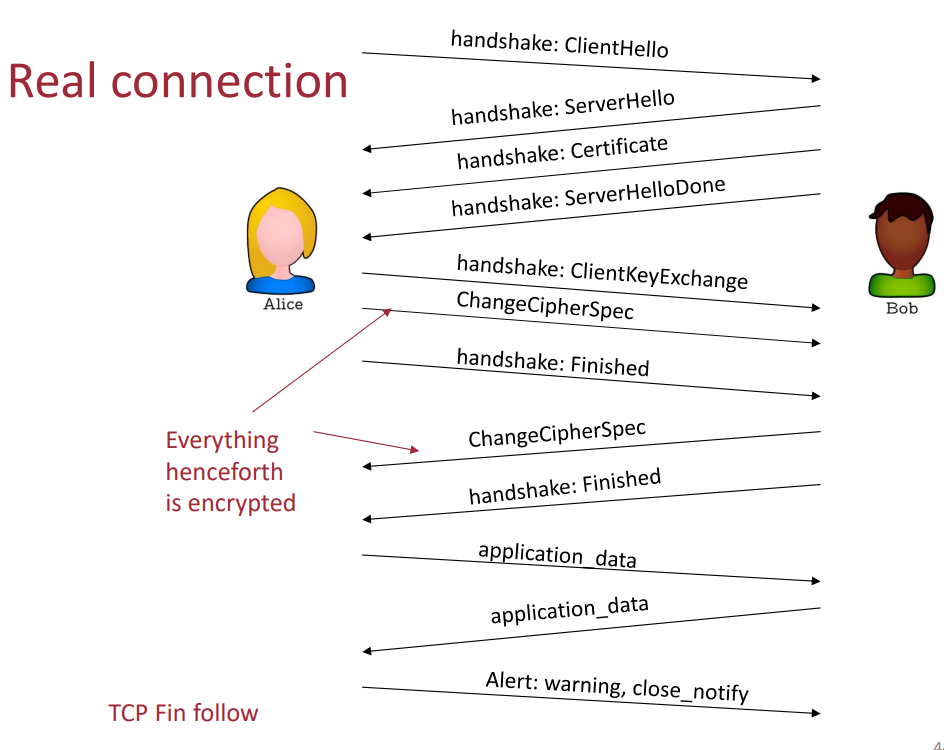
Fig.4: Handshake protocol message exchange
Key Derivation
In the handshake protocol chapter, we saw how the client and the server would arrive at the same pre-master secret, and then derive the master key from it (plus the exchanged nonces). But how is this derivation done, if the two entities must have the same master key, but cannot send that key to each other? The solution to this is the usage of pseudo random-number generator for key derivation.
Pseudo random-number generator: For the same given input, it produces the same output
On the topic of master keys, we saw how we needed to come up with a master key to ensure confidentiality, but should we use this master key to encrypt all further traffic? The answer is NO! A cryptographic key should only be used for the same cryptographic operation (examples of different cryptographic operations are: encrypting message content in the client side; encrypting message in the server side; generating MAC addresses in the server side, etc.). Because of this, we need to generate four different session keys:
- -> Encryption key for data sent from client to server
- -> MAC key for data sent from client to server
- -> Encryption key for data sent from server to client
- -> MAC key for data sent from server to client
These keys are generated from another key derivation function (KDF) using:
- Master Key
- Nonces
The KDF will then output a key block, that will be divided into these four keys plus client initialization vector and server initialization vector.
Master Secret Derivation
- MS = MD5(PMS | SHA(‘A’ | PMS | R1 | R2)) |
MD5(PMS | SHA(‘BB’ | PMS | R1 | R2)) |
MD5(PMS | SHA(‘CCC’ | PMS | R1 | R2)) |
…
Session Key Derivation
- = MD5(MS | SHA(‘A’ | MS | R1 | R2))
- = MD5(MS | SHA(‘BB’ | MS | R1 | R2))
- = MD5(MS | SHA(‘CCC’ | MS | R1 | R2))
- = MD5(MS | SHA(‘DDDD’ | MS | R1 | R2))